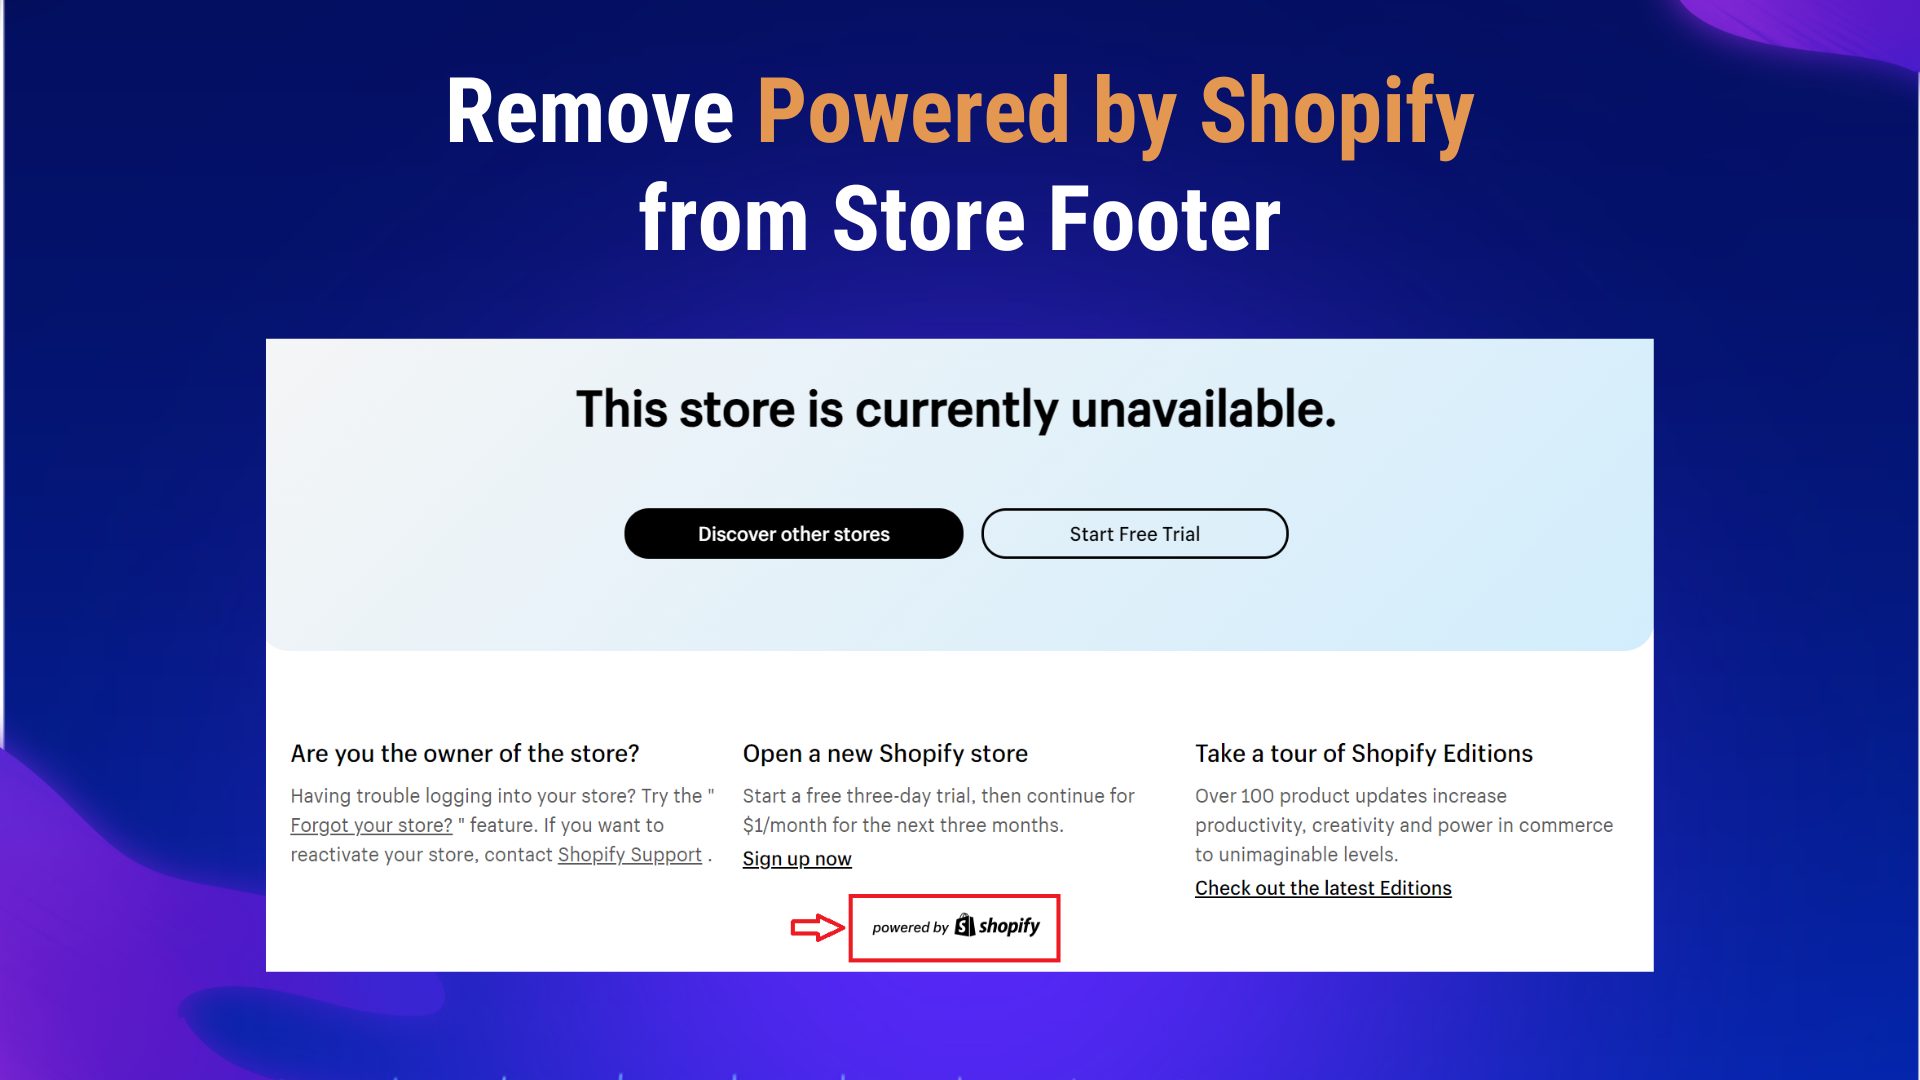
The “Powered by Shopify” tag is a small yet noticeable element that appears in the footer of Shopify stores. For many store owners, removing this tag is an essential step toward creating a unique, professional, and cohesive brand identity.
This guide will walk you through the guideline on how to remove the Powered by Shopify tag, explaining the reasons for doing so and providing step-by-step instructions for various methods. Whether you’re a new Shopify user or an experienced store owner, this guide will help you customize your store and give it better appearance.
Table of Contents
What Is Powered by Shopify?
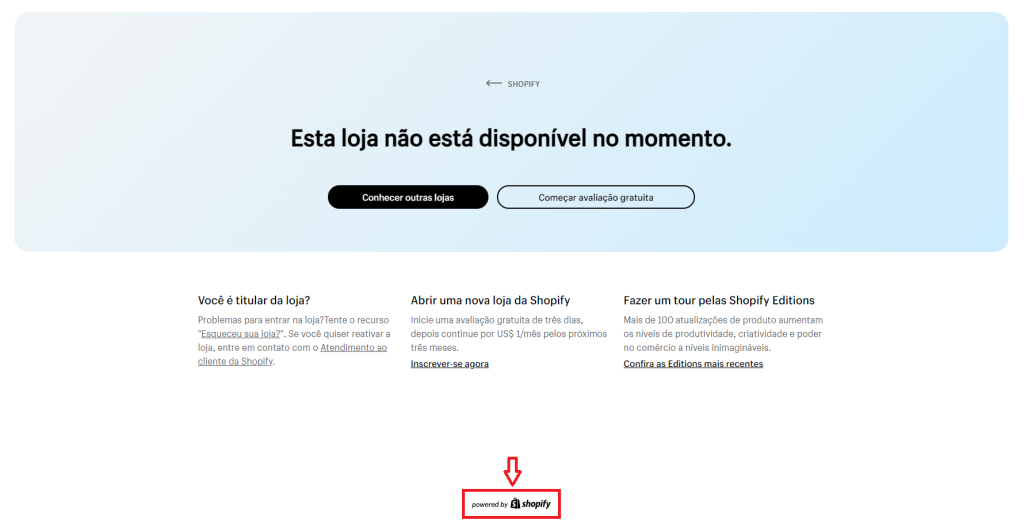
The “Powered by Shopify” tag is a small piece of text or a hyperlink that appears in the footer of Shopify-powered online stores. It serves as a credit to Shopify, indicating that the e-commerce platform is the foundation behind the store. This tag is a default element included in all Shopify themes and typically appears as either plain text or a clickable link that directs users to the Shopify website.
Why Remove the Powered by Shopify Tag?
Here are main reasons why Shopify merchants want to delete “powered by Shopify”.
Branding
Branding is important for you to establish a strong identity and make your business stand out in a crowded market. The “Powered by Shopify” tag, while a nod to the platform that supports your store, can detract from a polished, professional appearance. Removing it allows your brand to take center stage, giving your store a more personalized and cohesive look.
Customization
Every detail in your store contributes to the overall customer experience. By removing the “Powered by Shopify” tag, you can tailor your store to meet specific design preferences and functional needs. This customization ensures that every aspect of your store aligns with your brand’s unique voice and aesthetic.
Competitive Edge
In a competitive e-commerce landscape, differentiation is key. Many Shopify stores leave the “Powered by Shopify” tag in place, so removing it can give your store a subtle but significant edge. It shows a level of attention to detail and professionalism that can help you build trust with your customers.
What to Prepare Before Removing “Powered by Shopify”
To make the removal smooth and avoid unexpected issues, you are recommended implementing the tasks below:
Access and Permissions
Before you begin, ensure you have the necessary permissions to make changes to your Shopify store. You need admin access to modify theme settings and code. If you’re not the store owner, contact the owner or an admin for the required permissions.
Backing Up the Store
Making changes to your store’s theme involves a degree of risk. It’s crucial to back up your theme and store settings before proceeding. This will ensure that you can easily restore your store to its previous state if something goes wrong.
- Navigate to Online Store > Themes.
- Click on Actions > Duplicate next to your current theme. This creates a copy of your theme, which you can revert to if needed.
Understanding the Shopify Interface
Familiarizing yourself with the Shopify admin panel is essential, especially if you’re new to the platform. Key areas include the “Themes” section, where you’ll access theme settings and code, and the “Online Store” tab, which houses all customization options.
How to Remove the Powered by Shopify
Removing the “Powered by Shopify” tag is a common step for store owners who want to create a more customized and professional look for their online store. This guide provides two main methods for removing the tag: using the Shopify admin panel and editing the theme code. Additionally, advanced customization options are discussed to help you further personalize your store.
Method 1: Using the Shopify Admin Panel
In this guide, we will take all the steps using the Neat Shopify theme.
1. Logging In
To begin, log into your Shopify account:
- Visit the Shopify website.
- Enter your store URL, followed by your username and password.
- Click the “Log in” button to access your Shopify admin dashboard.
2. Navigating to Themes
Next, navigate to the Themes section:
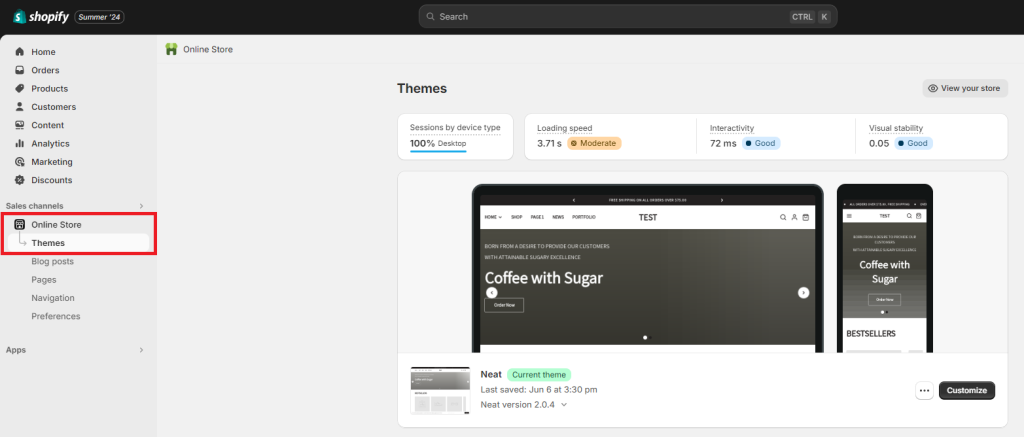
- In the left-hand menu, click on Online Store.
- Under the “Themes” heading, you will see your current theme displayed at the top.
3. Editing Languages
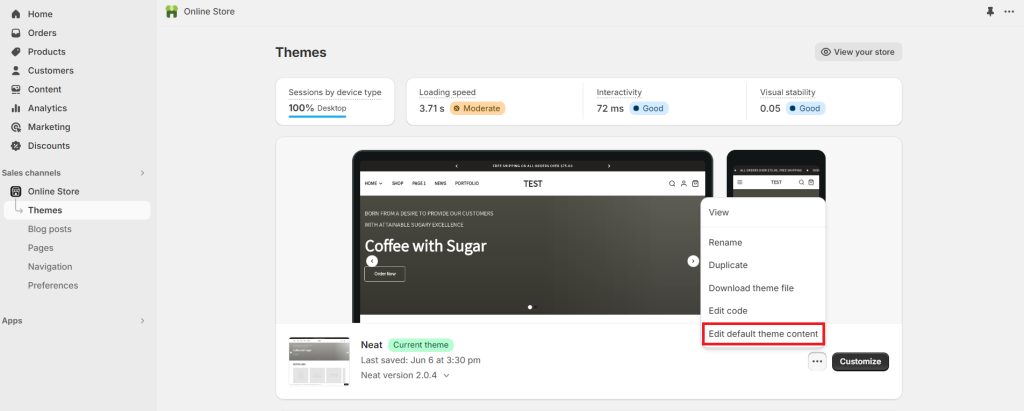
To hide the tag without touching the code, use the language editor:
- Click on “…” next to your current theme and select Edit default theme content.
4. Locating the Tag
Find the specific text to modify:
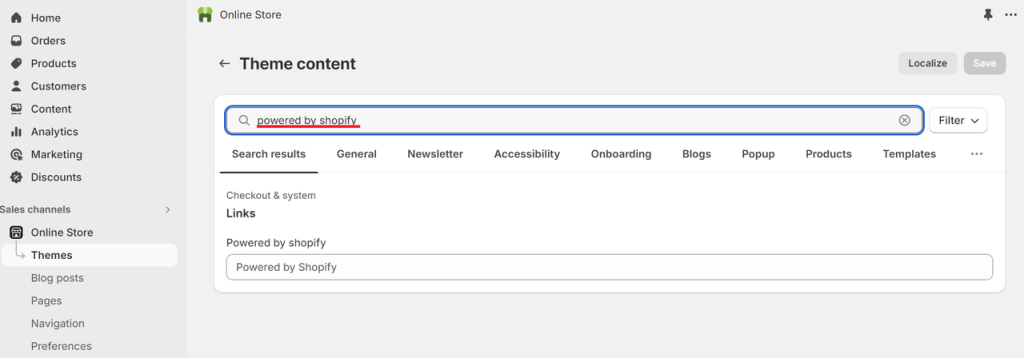
- In the language editor, use the search bar to type “Powered by Shopify”.
5. Removing or Replacing Text
Remove or replace the tag:
- Once you find the “Powered by Shopify” text field, you can delete the text or replace it with something else (e.g., a custom message or link).
6. Saving Changes
Finalize your changes:
- Click the Save button at the top right of the screen.
- Visit your store’s front end to ensure the “Powered by Shopify” tag has been removed or replaced as desired.
Method 2: Editing the Theme Code
1. Accessing Theme Code
If you prefer to edit the code directly:
- In the Shopify admin panel, go to Online Store > Themes.
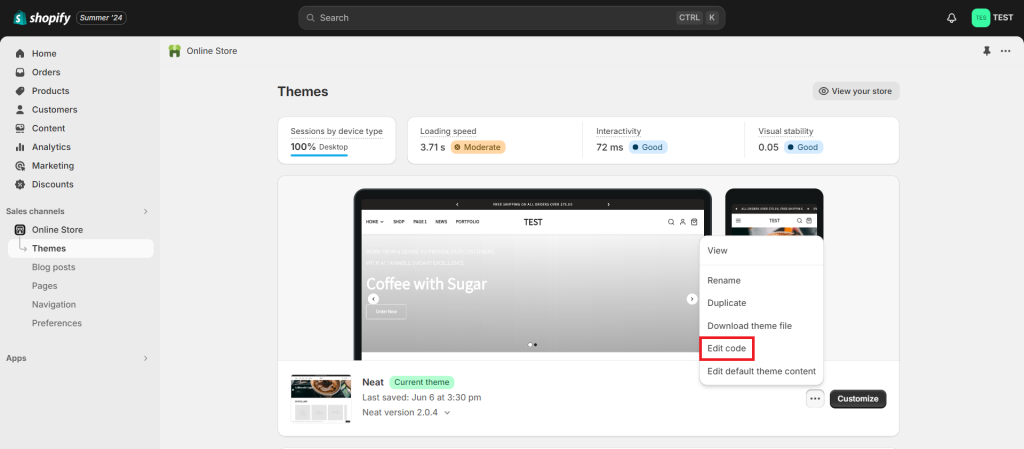
- Click on Actions next to your current theme and select Edit code.
2. Finding Footer.liquid
Locate the specific file that contains the tag:
- In the code editor, navigate to the Sections folder.
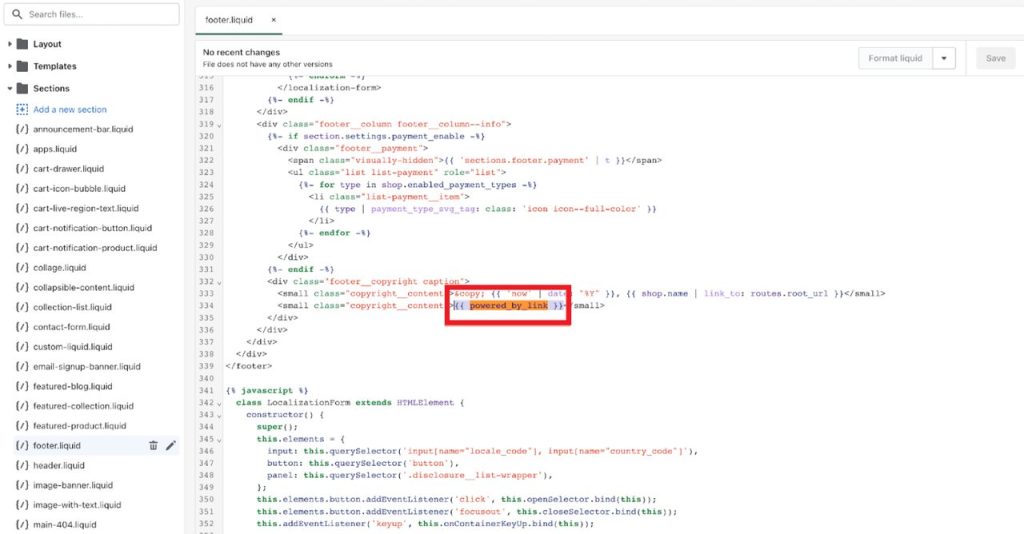
- Find and click on the footer.liquid file.
3. Editing the Code
Modify the code to get rid of the tag:
- Search for the “Powered by link” text within the footer.liquid file.
Type Ctrl+F (if you are using PC), or Command+F (if you are using MacOs).
- Remove the line of code containing this text.
4. Saving and Previewing
Ensure your changes take effect:
- Save the changes by clicking the Save button at the top right.
- Preview your store to verify that the “Powered by Shopify” tag is no longer displayed.
Let’s explore how to remove shipping calculated at checkout Shopify.
Advanced Customization Options
Replacing with Custom Text
Instead of simply removing the “Powered by Shopify” tag, you might want to replace it with custom text or links:
- In the language editor, change the “Powered by Shopify” text to your custom message.
- Alternatively, in the footer.liquid file, replace the relevant code with HTML for your custom text or links.
Using Apps for Footer Customization
Several Shopify apps can assist with footer customization, providing user-friendly interfaces that don’t require code editing:
- Shogun Page Builder: Offers drag-and-drop customization for various parts of your store, including the footer.
- GemPages Page Builder: Another robust tool for creating custom pages and sections.
- PageFly Advanced Page Builder: Provides extensive options for customizing your store’s layout.
Ensuring Responsiveness
It’s crucial to ensure that your customizations look good on all devices:
- Use Shopify’s built-in preview tools to check how your store appears on desktops, tablets, and mobile devices.
- Make necessary adjustments to maintain a responsive and professional design across all screen sizes.
Troubleshooting and FAQs
Even after following the steps to remove the “Powered by Shopify” tag, you may encounter some issues. Here’s how to address common problems and answers to frequently asked questions.
Common Issues
Tag Not Removed
- Clear Browser Cache: If the “Powered by Shopify” tag is still visible after making changes, try clearing your browser cache. Sometimes, the browser may display an old version of your site.
- Save Changes: Ensure you’ve saved your changes properly. After editing the language settings or theme code, always click the Save button.
- Check All Pages: Verify that the tag has been removed from all pages, as some themes might have multiple instances of the footer file.
Changes Not Saving
- Permissions: Double-check that you have the necessary permissions. Ensure you are logged in with an account that has admin access.
- Correct Theme: Confirm that you’re editing the correct theme, especially if you have multiple themes installed. The active theme should be the one you’re making changes to.
- Duplicate Theme: If problems persist, try duplicating your theme and making changes to the duplicate. This can sometimes resolve issues related to theme corruption.
Frequently Asked Questions
Can I remove the tag without editing code?
- Yes, using the language editor in the Shopify admin panel allows you to remove the “Powered by Shopify” tag without touching the code. This method is user-friendly and ideal for those who are not comfortable with coding.
Will removing the tag affect my store’s performance?
- No, removing the “Powered by Shopify” tag will not impact your store’s performance. The tag is purely a text element and does not affect the functionality or speed of your site.
Can I replace the tag with something else?
- Yes, you can replace the “Powered by Shopify” tag with custom text or links. This can be done using the language editor or by editing the theme code. Replacing the tag with a custom message, slogan, or important links can enhance your store’s branding and professionalism.
To Wrap up,
Removing the “Powered by Shopify” tag is a straightforward process that can significantly give a possitive affect on the look and feel of your online store. By following the steps outlined in this guide, you can either use the Shopify admin panel for a quick fix or delve into the theme code for more control. Additionally, exploring advanced customization options ensures your store remains unique and professional, reflecting your brand’s identity effectively.

