WooCommerce login and registration is an important part of any WooCommerce online store. It helps you manage and control your data easier when you run a WooCommerce store.
But have you already known how to customize WooCommerce login page and registration? This problem is exactly what we will discuss in this article.
Nevertheless, the default WooCommerce login page and registration is quite limited. So we will also introduce you to what you can do beyond everything WooCommerce delivers.
Table of Contents
Default WooCommerce Customer Login Options
WooCommerce already has some options for customers to log in and register. The most noticeable sign is the “Account” page. Here, you can see the login and registration form.
Besides, the checkout page may contain a WooCommerce login form, depending on your setup. The main difference here is the inline form. Hence, when you click on the “Log In” button, the form will show up on the checkout page without directing users to another page.
That is an excellent solution since users can make a purchase faster and easier.
Suppose you want to customize the WooCommerce registration form and login form to your liking. In that case, WooCommerce does not provide any options for it.
Why do You Need to Custom WooCommerce Login Page and Registration?
WooCommerce Separate Login and Registration Pages
As I said before, both the WooCommerce login and registration form are displayed on the same page by default. Thus, you do not have an option to separate them if you prefer. That means you need a third-party solution to solve this problem.
Limited Field Options
The default WooCommerce login page and registration has all the fields for a user to create an account.
However, suppose you need to add and display other sections like drop-down menus, checkboxes, or billing and shipping address wherever. In that case, WooCommerce does not give you a choice.
Design Limitations
You may see that the WooCommerce login page and registration design is a little boring and dull.
Unfortunately, WooCommerce also does not allow you to change it if that is the case. In other words, you can not change the colors, formats, text, and borders except using plugins or code.
How to Customize WooCommerce Login Page and Registration?
Method 1: Customize WooCommerce Login Page and Registration Using Shortcode
You probably already know that the shortcode [woocommerce_my_account] has both login and registration combined. But this might not be the way you want it to be.
Suppose you want to create a popup that shows only a registration form for a specific page. In that case, using the shortcode alone, you can not achieve that purpose since it will also contain the login form. That is when you need to create your own WooCommerce login shortcode.
Before you start, you should know that the [woocommerce_my_account] shortcode is very important. And you must keep it on the My Account page at all costs.
We mean if you want to keep the ‘My Account’ dashboard and the login form has the same URL, you can keep using [woocommerce_my_account] for that, along with the new shortcodes.
If you want the Sign in and My Account page separate from the Registration page, you will need to apply both shortcodes we have shown below:
- [woocommerce_my_account] on the Login / My Account Page;
- [wc_reg_your_form] on the WooCommerce Register Page.
If you want a separate Sign In, Sign Up, and My Account page, you need the following three shortcodes:
- [woocommerce_my_account] on the My Account Page;
- [wc_login_your_form] on the Login Page;
- [wc_reg_your_form] on the Register Page.
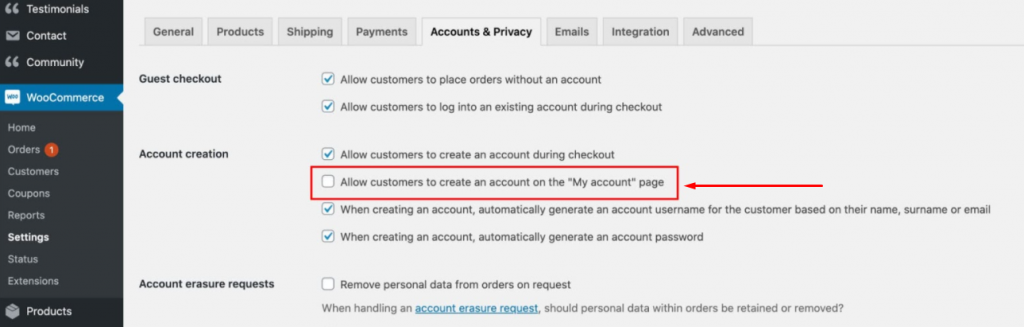
In either case, you need to disable “Allow customers to create an account on the ‘My Account’ page” in the WooCommerce Setting page:
Step 1: Separate WooCommerce Registration Form
Place the WooCommerce register form shortcode [wc_reg_your_form] in a brand new Registration page. When you have done it, the registration form should appear.
add_shortcode( 'wc_reg_your_form', 'your_separate_registration_form' );

function your_separate_registration_form() {
   if ( is_admin() ) return;
   if ( is_user_logged_in() ) return;
   ob_start();
   do_action( 'woocommerce_before_customer_login_form' );
   ?>
      <form method="post" class="woocommerce-form woocommerce-form-register register" <?php do_action( 'woocommerce_register_form_tag' ); ?> >
         <?php do_action( 'woocommerce_register_form_start' ); ?>
         <?php if ( 'no' === get_option( 'woocommerce_registration_generate_username' ) ) : ?>
            <p class="woocommerce-form-row woocommerce-form-row--wide form-row form-row-wide">
               <label for="reg_username"><?php esc_html_e( 'Username', 'woocommerce' ); ?> <span class="required">*</span></label>
               <input type="text" class="woocommerce-Input woocommerce-Input--text input-text" name="username" id="reg_username" autocomplete="username" value="<?php echo ( ! empty( $_POST['username'] ) ) ? esc_attr( wp_unslash( $_POST['username'] ) ) : ''; ?>" /><?php // @codingStandardsIgnoreLine ?>
            </p>
         <?php endif; ?>
         <p class="woocommerce-form-row woocommerce-form-row--wide form-row form-row-wide">
            <label for="reg_email"><?php esc_html_e( 'Email address', 'woocommerce' ); ?> <span class="required">*</span></label>
            <input type="email" class="woocommerce-Input woocommerce-Input--text input-text" name="email" id="reg_email" autocomplete="email" value="<?php echo ( ! empty( $_POST['email'] ) ) ? esc_attr( wp_unslash( $_POST['email'] ) ) : ''; ?>" /><?php // @codingStandardsIgnoreLine ?>
         </p>
         <?php if ( 'no' === get_option( 'woocommerce_registration_generate_password' ) ) : ?>
            <p class="woocommerce-form-row woocommerce-form-row--wide form-row form-row-wide">
               <label for="reg_password"><?php esc_html_e( 'Password', 'woocommerce' ); ?> <span class="required">*</span></label>
               <input type="password" class="woocommerce-Input woocommerce-Input--text input-text" name="password" id="reg_password" autocomplete="new-password" />
            </p>

         <?php else : ?>
            <p><?php esc_html_e( 'A password will be sent to your email address.', 'woocommerce' ); ?></p>
         <?php endif; ?>
         <?php do_action( 'woocommerce_register_form' ); ?>
         <p class="woocommerce-FormRow form-row">
            <?php wp_nonce_field( 'woocommerce-register', 'woocommerce-register-nonce' ); ?>
            <button type="submit" class="woocommerce-Button woocommerce-button button woocommerce-form-register__submit" name="register" value="<?php esc_attr_e( 'Register', 'woocommerce' ); ?>"><?php esc_html_e( 'Register', 'woocommerce' ); ?></button>
         </p>
         <?php do_action( 'woocommerce_register_form_end' ); ?>
      </form>
   <?php
   return ob_get_clean();
}
Step 2: WooCommerce separate login page and registration page
Before doing this, please check the information above as you may not need to use this shortcode. The [woocommerce_my_account] shortcode may be enough. In other words, you do not need a WooCommerce login form shortcode.
If not, add this shortcode [wc_login_your_form] to a brand new WooCommerce custom login page.
add_shortcode( 'wc_login_your_form', 'your_separate_login_form' );
function your_separate_login_form() {
   if ( is_admin() ) return;
   if ( is_user_logged_in() ) return;
   ob_start();
   woocommerce_login_form( array( 'redirect' => '#' ) );
   return ob_get_clean();
}
Those are everything you need to separate WooCommerce Sign In and WooCommerce sign up page.
Method 2: Customize WooCommerce Login Page and Registration Using a Plugin
You can customize your login pages and registration with just one plugin – User Registration. We suggest this plugin as it has a drag-and-drop interface, which is easy to use. So you do not need to know to code for modifications.
Step 1: Installation
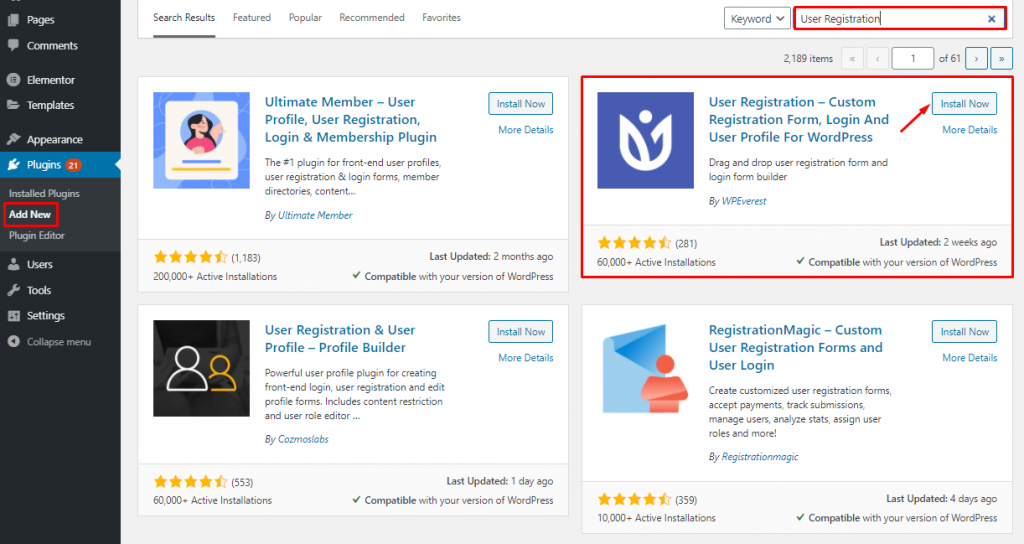
To install this registration plugin, go to Plugins > Add new > search for “user registration” > click “Install Now“
After installing the plugin, you need to activate it on your WooCommerce store then upgrade the plugin to get the premium WooCommerce Integration feature.
Install the WooCommerce Integration Add-on
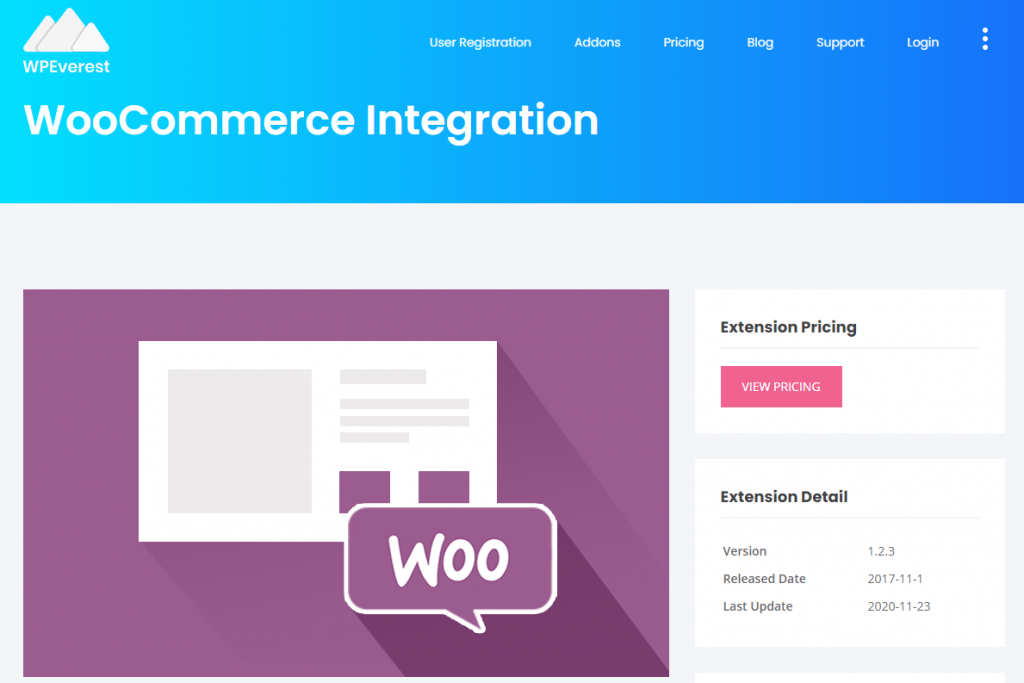
Now, you need to get the premium User Registration WooCommerce Add-on. Go to User Registration > Extensions. Here, you can see all the Add-ons offered by the User Registration plugin.
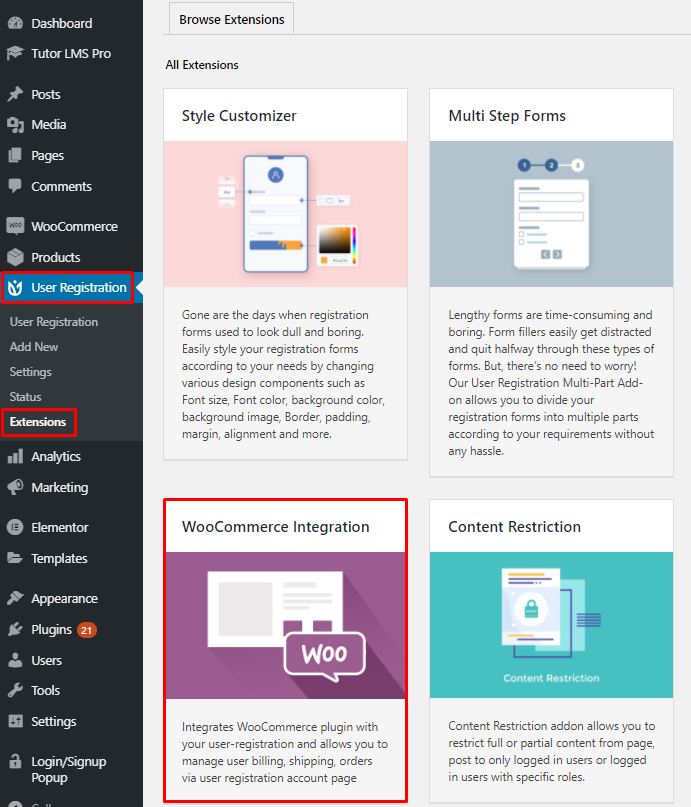
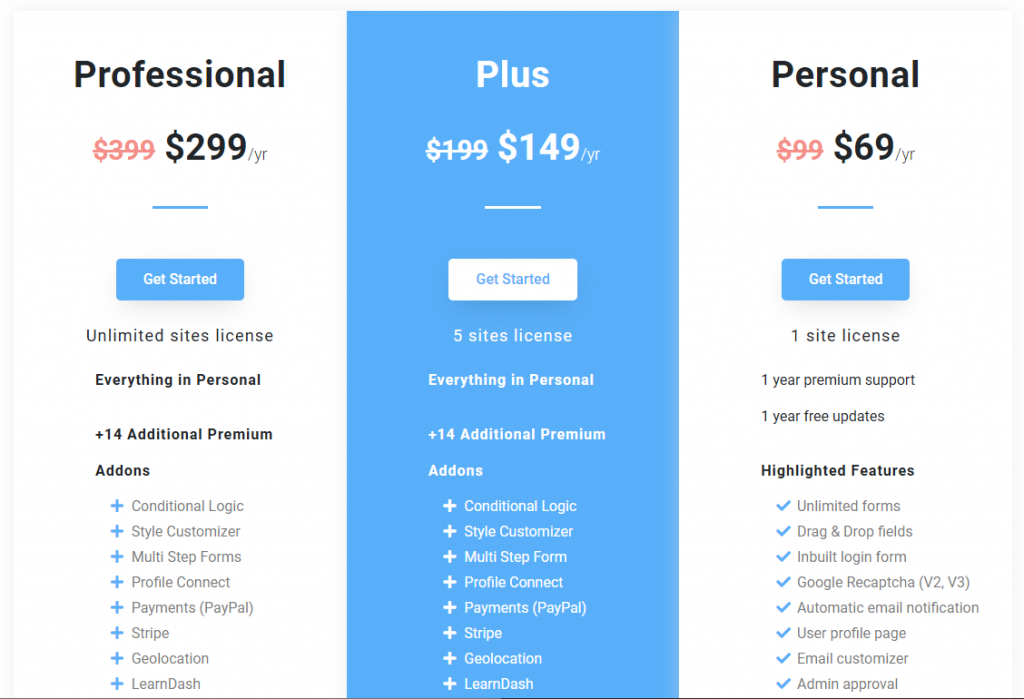
Click on the WooCommerce Integration extension, and you’ll be driven to its official website. Then, click on the View Pricing button there to get more details about each plan.
Now, select your suitable plan and then process to the checkout step to install the WooCommerce integration addon to your site.
After the installation process, let’s follow the steps below to create and customize the WooCommerce registration form and login form.
Step 2: Add More Fields on your WooCommerce Login or Registration Form
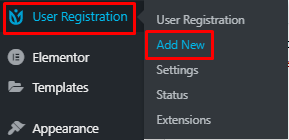
With this WooCommerce register form plugin, you can add custom user registration fields for WooCommerce. First, you need to create a new user registration form by going to ‘User registration’ -> ‘Add new’ in your WordPress dashboard.
Then a new screen will appear as below. By default, there will be a registration form including User Email and User Password.
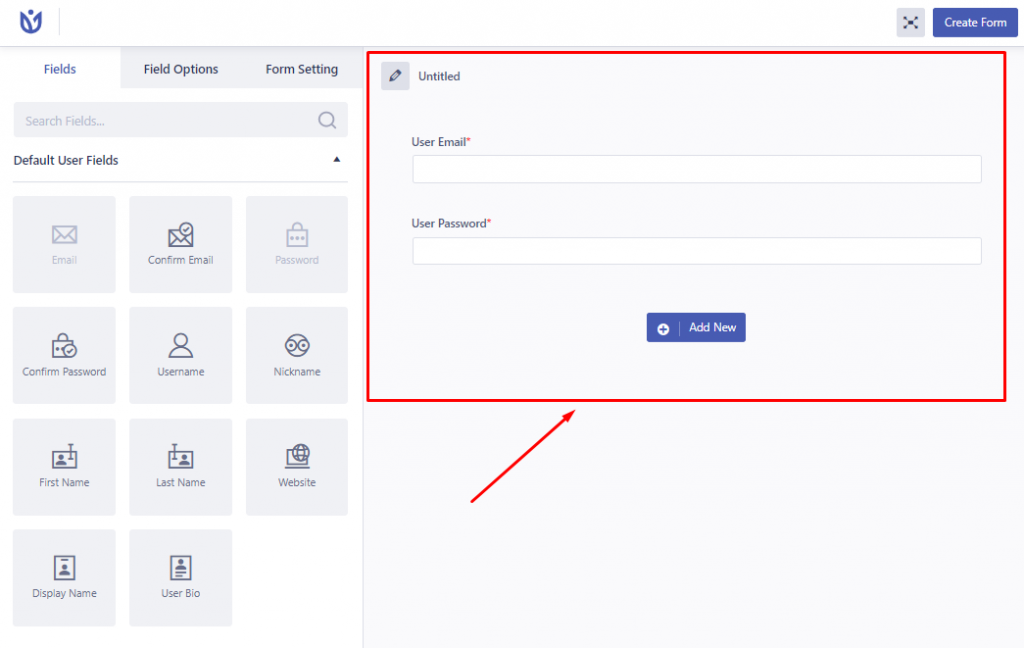
However, you can add additional WooCommerce registration fields using drop-down menus, radio buttons, and checkboxes, and change the name of the form if necessary.
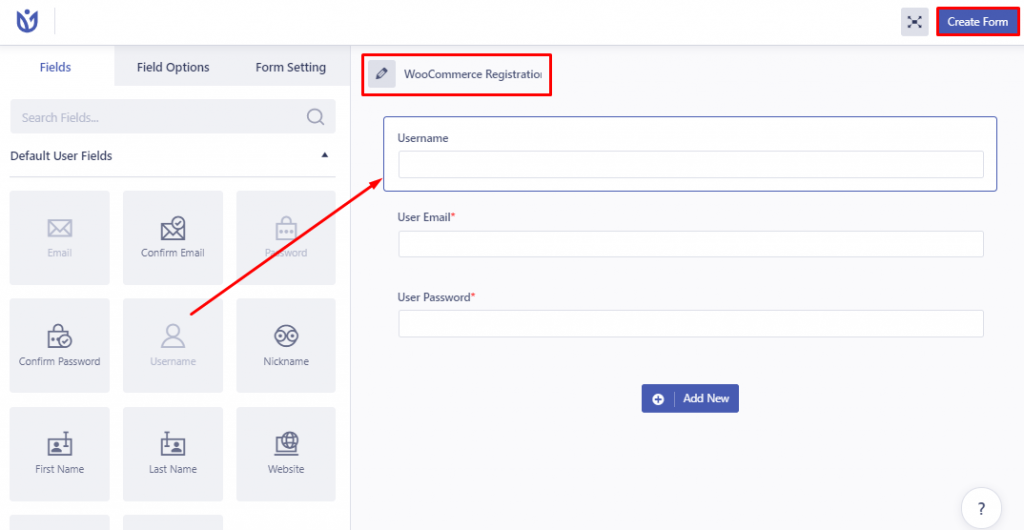
These fields can be easily added because of the easy-to-use drag and drop feature.
When you are done with customizing the form, you need to hit the Create Form button to complete the process.
Step 3: Replace the default WooCommerce Login Registration Pages
After you have created a new login or WooCommerce custom registration form, you will need to replace the default WooCommerce form with it.
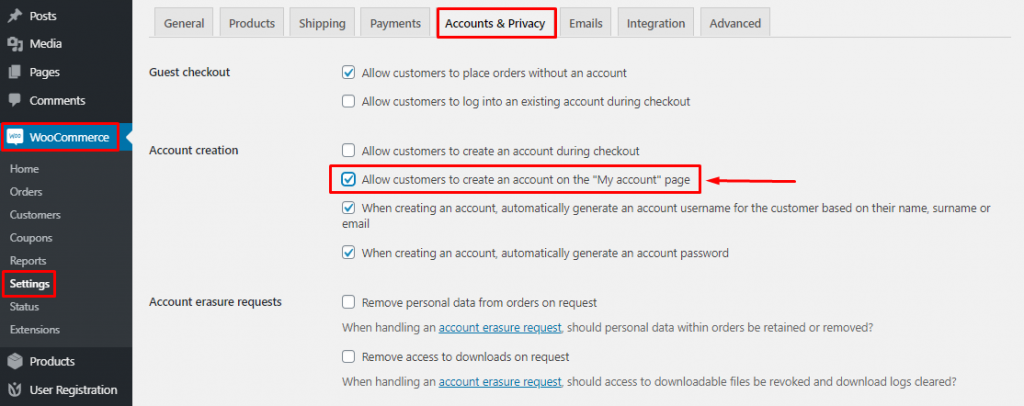
All you need to do is go to ‘WooCommerce’ -> ‘Settings’, then open the ‘Account and Privacy’ tab. You will see a checkbox that says, “Allow customers to create an account on the ‘My Account’ page“. Check it and click Save Changes.
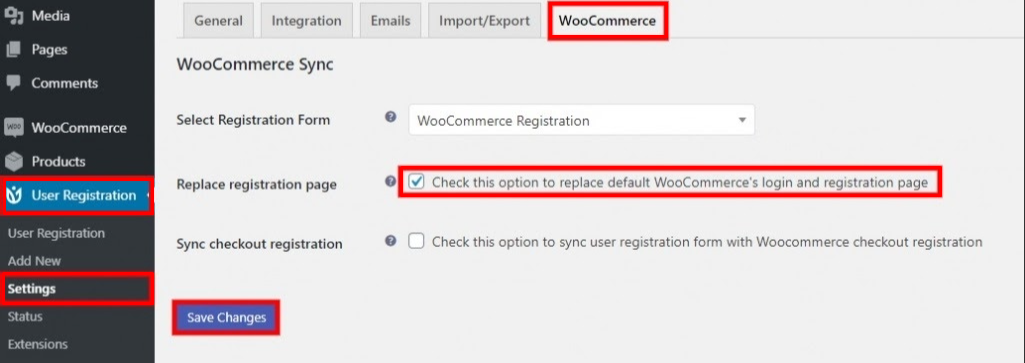
After that, navigate to User Registration > Settings > open the WooCommerce tab. Here, choose the registration form you want to use. Then, check the option “Check this option to replace default WooCommerce’s login and registration page” and save the changes.
Your custom WooCommerce login and user registration form should be displayed at this moment.
Step 4: Separate WooCommerce Login and Registration Page
By default, both the WooCommerce login and registration forms are displayed on the same page. Suppose you want to show them on different pages. In that case, create new separate pages for the login and registration pages.
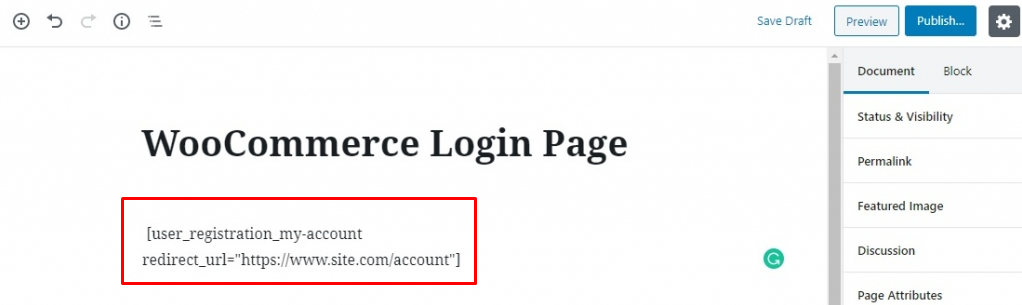
To display the login page separately, place the shortcode below on the page you want to show it. You may also need to redirect to the link of the account page after the users log in. Just add the link of the page at the redirect_url parameter and then publish the page.
[user_registration_my-account redirect_url=”account page link”]
To separate the registration page, you need to get the shortcode of the WooCommerce Registration that you created by going to User Registration > User Registration in your WordPress dashboard.
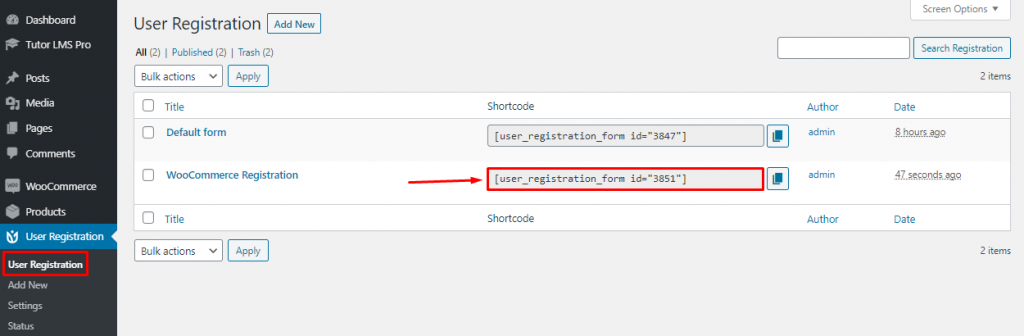
Here you can see the shortcode, just copy and paste it on the page where you want to display the registration form. Then, publish the page.
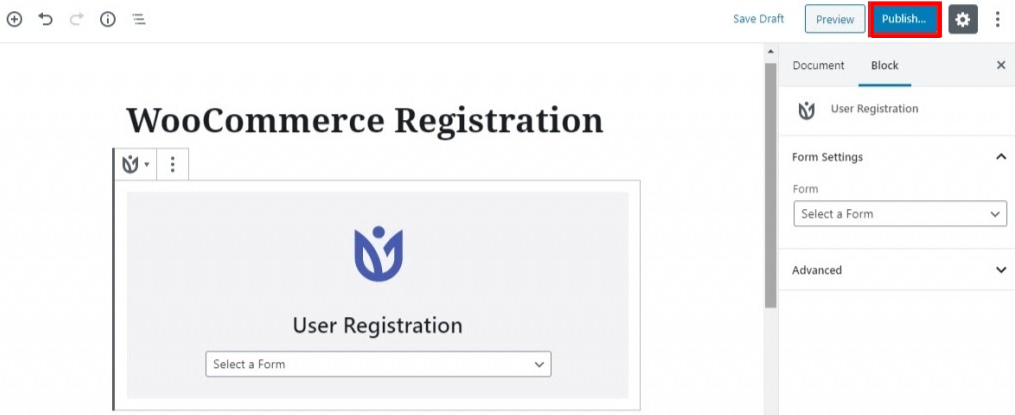
Or you can simply use a block on the block editor to present the registration form you created after creating a new page. Just search for the ”User Registration” block.
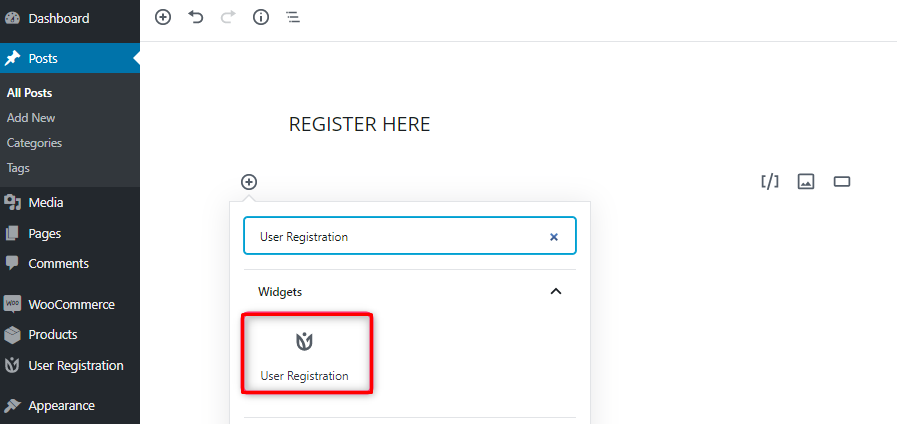
Then choose the registration form you want to show. When you are satisfied, publish the page.
That is the way you can do to separate WooCommerce login page and registration with a plugin.
Final Words,
There are some of the most common methods to customize WooCommerce login page and registration.
They can also be great ways to attract a large number of customers to your website with an easy interface for them to create or log into their account.
If you are looking for other ways to better your WooCommerce store, let’s take a look at the list of best WooCommerce plugins to find out the most suitable one for your site.
If you have any questions, please ask us in the comment section below. We will get back to you soon.
Explore more: